Automated Deployment of Laravel Project
In this article I would like to share my approach to automated deployment of a Laravel project. I have been successfully using this approach for my side projects. In this article I will share Laravel project deployment on Linux (Digital Ocean) server.
In a nutshell deploying Laravel project consists of
- “building” it (installing composer dependencies, installing npm packages and “compiling” javascript)
- zipping up the build, ssh uploading it to your server and unzipping
- running migrations, re-cashing confing, clearing view cache, restarting queue workers, etc
- Symlinking to the folder you are serving your app from
We can automate all this tasks using Jenkins. Since I don’t work on my side projects very often, having a designated server instance for Jenkins (don’t install Jenkins on your production server) felt a waste of money. So I decided to install Jenkins on my local development system, in my case Windows.
Installing Jenkins on Windows
To install Jenkins on Windows follow the instructions here. As the instruction suggests run Jenkins as a local user. In order to do that create a new user on Windows and enable service logon for this user. This article explains how to make a user logon as a service making changes in Local Security Policy. Try typing “Local Security Policy” in Window’s search. If it does not open up, you may need to enable policy group editor. Here is the video that will explain how to do that. After installing Jenkins if you can’t find initialAdminPassword in the place where instructions specify, try checking AppData\Local\Jenkins.jenkins\secrets folder of the user you created to run Jenkins under.
After installing Jenkins, take a break and watch this Laracon EU video, because we will be doing pretty much the same thing.
Configuring Jenkins for Automated Deployment of Laravel Project
When configuring Publish Over SSH section to connect to your server, you may need to provide ssh key in pem format. Here is how to convert it. It may take a little while to connect Jenkins to your server, but be patient.
When creating a project, choose a free style project. It is a good idea to limit number of builds and how many days you want to keep them. When connecting to your Github repository, click add credentials and use “SSH username with private key”. Github is deprecating the ability to use username and password to connect to repos.

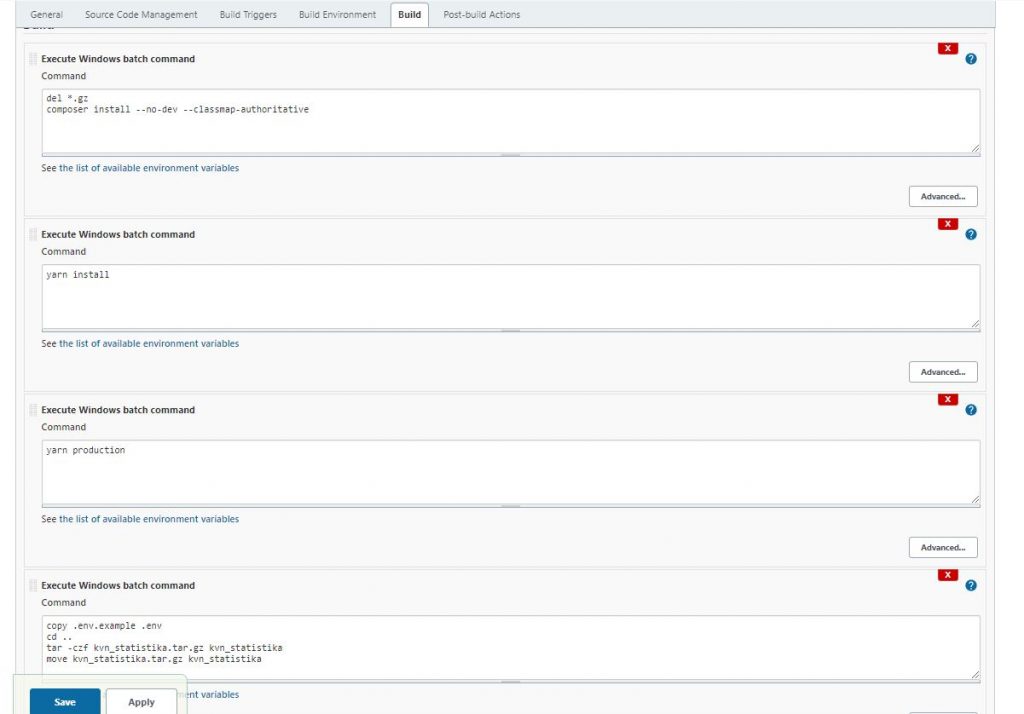
Below is the build section of my project.
Since I am using Windows, I selected “Execute Windows batch command”. I had to split my build commands in four sections because for some reason the build was failing when I had all my commands in one section. Here is the trick to call your Jenkins project the same name as it is called in the commands. In my case Jenkins project and the folder that is being zipped is called kvn_statistika
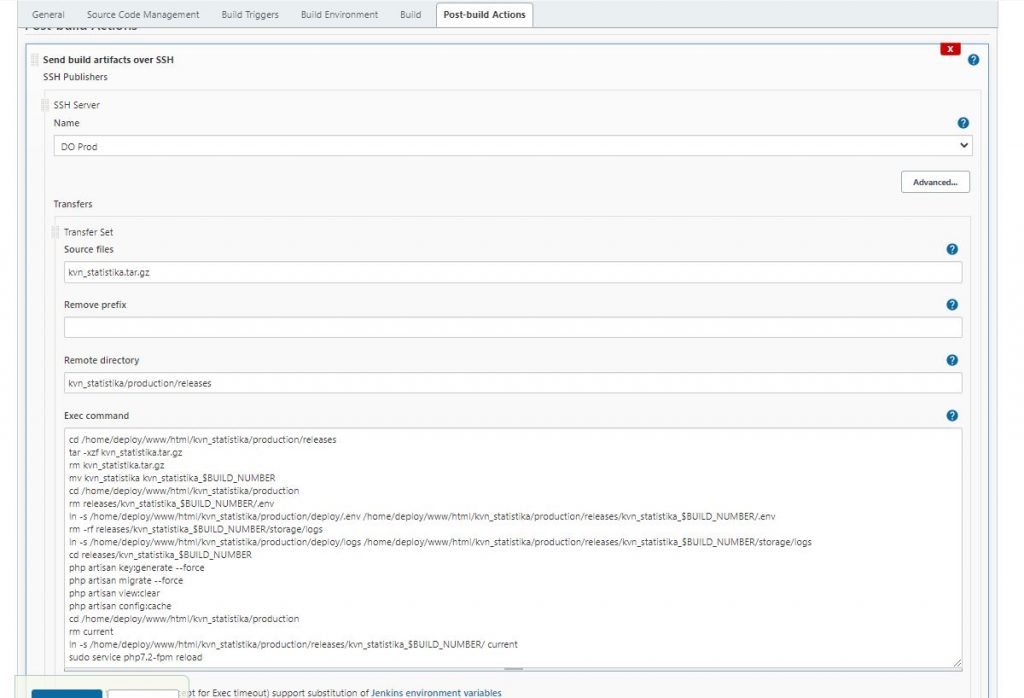
The next step is to configure Post-build Actions

Post Build Commands Explained
It basically takes kvn_statistika.tar.gz file and drops ssh copies it into remote directory on production server. Here is what the commands we are running:
cd /home/deploy/www/html/kvn_statistika/production/releases
tar -xzf kvn_statistika.tar.gz
rm kvn_statistika.tar.gz
mv kvn_statistika kvn_statistika_$BUILD_NUMBER
cd /home/deploy/www/html/kvn_statistika/production
rm releases/kvn_statistika_$BUILD_NUMBER/.env
ln -s /home/deploy/www/html/kvn_statistika/production/deploy/.env /home/deploy/www/html/kvn_statistika/production/releases/kvn_statistika_$BUILD_NUMBER/.env
rm -rf releases/kvn_statistika_$BUILD_NUMBER/storage/logs
ln -s /home/deploy/www/html/kvn_statistika/production/deploy/logs /home/deploy/www/html/kvn_statistika/production/releases/kvn_statistika_$BUILD_NUMBER/storage/logs
cd releases/kvn_statistika_$BUILD_NUMBER
php artisan key:generate --force
php artisan migrate --force
php artisan view:clear
php artisan config:cache
cd /home/deploy/www/html/kvn_statistika/production
rm current
ln -s /home/deploy/www/html/kvn_statistika/production/releases/kvn_statistika_$BUILD_NUMBER/ current
sudo service php7.2-fpm reload
First we extract the tar ball and rename it tacking on the build number. So we have kvn_statistika_11 or something. Then we delete .env file used during the build and symlink our production env file that is located in deploy directory. We do the same way with the logs in kvn_statistika_11 folder. We delete them and symlink the logs from the deploy directory. That way we will keep our logs persistent between deploys. Then we cd into our release folder (kvn_statistika_11) and run artisan commands. They may be different depending on your project. After that we symlink our deploy directory to the folder we are serving our application from (in our case it is folder named current). The last step is to reload php fpm to reset the opcache. For this last command you may have to give your user under which Jenkins logs in the sudo permissions to run certain commands. Here is how to do it.
Creating an automated deployment of your Laravel project may be challenging and take some time. But this is an investment. So next time you have to deploy, you just click Build Now.
References
How To Enable Group Policy Editor In Windows 10 Home Tutorial | Enable Gpedit.msc
Simplified Continuous Integration with Laravel and Jenkins – Margaret Staples
