From Localhost to the Cloud: Deploying Full Stack Apps on AWS EC2
In this article, we’ll walk through how to deploy a full-stack Next.js task manager application to an Amazon EC2 instance on AWS. The application uses Amazon Cognito for authentication and includes a simple CRUD system powered by MongoDB. Both the application and the database will be deployed using Docker containers.
To make the application accessible to users, we’ll configure a reverse proxy. We’ll also set up the EC2 instance with the necessary permissions to integrate with Amazon Cognito, send logs to CloudWatch, and pull Docker images from Amazon Elastic Container Registry (ECR).
Let’s get started by launching and configuring our EC2 instance.
Launch EC2 Ubuntu Instance and SSH Into It
Step 1: Start the Launch Process
- Navigate to the EC2 Dashboard by searching for “EC2” in the top search bar.
- In the Resources section, click on Instances.
- Click the orange Launch instances button in the top right corner.
Step 2: Name and OS Selection
- Name: Under the “Name and tags” section, enter:
nextjs-task-manager-instance - Application and OS Images (Amazon Machine Image): Select the Ubuntu icon.
- Ensure the Ubuntu Server 24.04 LTS (Free tier eligible) is selected in the dropdown.
Step 3: Instance Type and Key Pair
- Instance type: Click the dropdown and select t3.micro (Note: this instance is Free Tier eligible in many regions).
- Key pair (login): Click Create new key pair.
- Key pair name: Give it a name you’ll remember (e.g.,
nodejs-task-manager-instance-key). - Key pair type: RSA.
- Private key file format:
.pem. - Click Create key pair.
- Key pair name: Give it a name you’ll remember (e.g.,
- Save the file: Move the downloaded
.pemfile to your.sshfolder.- On Windows:
C:\Users\<YourUsername>\.ssh - On Mac/Linux:
~/.ssh/
- On Windows:
Step 4: Configure Network Settings
In the Network settings section, ensure Create security group is selected, then configure the following rules:
- Allow SSH traffic from: Check this box and select My IP from the dropdown. (This ensures only you can access the instance via terminal).
- Allow HTTPS traffic from the internet: Check this box (Port 443).
- Allow HTTP traffic from the internet: Check this box (Port 80).
Step 5: Review and Launch
- Review your settings in the Summary panel on the right side.
- Click the Launch instance button.
- Click View all instances to see your new instance initializing.
Step 6: Connect to your Instance via SSH
- Go to Instances: In the AWS Console, navigate to the EC2 Dashboard and click on Instances.
- Select the Instance: Check the box next to your launched instance:
nodejs-cognito-instance. - Click Connect: At the top of the page, click the Connect button.
- Select SSH Client: Click on the SSH client tab. This tab provides specific instructions and a pre-formatted command for your instance.
- Copy Example: Under the Example section at the bottom, click the copy icon next to the
ssh -i ...command. - Open the Terminal: * Windows: Open the Git Bash terminal (installed with Git).
- Mac/Linux: Open your standard Terminal.
- Paste and Modify the Command: Paste the command into your terminal. You must prefix your key name with
~/.ssh/so the terminal knows where the file is located.The final command should look like this:Bashssh -i "~/.ssh/your-key-name.pem" ubuntu@ec2-xxx-xxx-xxx-xxx.compute-1.amazonaws.com - Confirm Connection: Type
yesif prompted about the authenticity of the host and press Enter.
Docker Setup on Ubuntu Instance
sudo apt update
sudo apt upgrade
# Add Docker's official GPG key:
sudo apt install ca-certificates curl
sudo install -m 0755 -d /etc/apt/keyrings
sudo curl -fsSL https://download.docker.com/linux/ubuntu/gpg -o /etc/apt/keyrings/docker.asc
sudo chmod a+r /etc/apt/keyrings/docker.asc

# Add the repository to Apt sources:
sudo tee /etc/apt/sources.list.d/docker.sources <<EOF
Types: deb
URIs: https://download.docker.com/linux/ubuntu
Suites: $(. /etc/os-release && echo "${UBUNTU_CODENAME:-$VERSION_CODENAME}")
Components: stable
Signed-By: /etc/apt/keyrings/docker.asc
EOF

sudo apt update

# Install the latest version of Docker
sudo apt install docker-ce docker-ce-cli containerd.io docker-buildx-plugin docker-compose-plugin

# The Docker service starts automatically after installation. To verify that Docker is running, use
sudo systemctl status docker

# If Docker is not running use
sudo systemctl start docker

# Run docker without sudo. Add ubuntu user to docker group
sudo usermod -aG docker ubuntu

# Apply new group membership
sudo su - ubuntu

# Confirm ubuntu user is now added to docker group
groups
Install AWS CLI on Ubuntu
sudo apt install awscli

# If the above doesn't work, try
sudo snap install aws-cli --classic
Create and Add a Role with Permissions to EC2 Instance
Step 1: Navigate to the IAM Dashboard
- In the top search bar of the AWS Console, type IAM.
- Select IAM from the list of services to open the Identity and Access Management dashboard.
- In the left-hand navigation pane, click on Roles.
- Click the orange Create role button in the top right corner.
Step 2: Select Trusted Entity
- Trusted entity type: Select AWS service.
- Service or use case: From the “Service or use case” dropdown or list, select EC2.
- Use case: Select EC2 again (Allows EC2 instances to call AWS services on your behalf).
- Click Next.
Step 3: Add Permission Policies
You will now attach the three required policies. Use the search bar to find each one and check the box next to it.
- Search for
AmazonCognitoPowerUser.- Check the box next to AmazonCognitoPowerUser.
- Clear the search bar and search for
AmazonECSTaskExecutionRole.- Check the box next to AmazonECSTaskExecutionRole.
- Clear the search bar and search for
CloudWatchLogsFullAccess.- Check the box next to CloudWatchLogsFullAccess.
- Click Next.
Step 4: Name and Review
- Role name: Enter the following name exactly:
ec2-app-deployment-role - Description: (Optional) You can add a description, such as “Role for EC2 app deployment with Cognito, ECS, and Logs access.”
Step 5: Create Role
- Scroll to the bottom of the page.
- Click the Create role button.
Step 6: Attach the Role to an EC2 Instance
- Navigate to the EC2 Dashboard.
- In the Resources section, click on Instances.
- Select the checkbox next to the specific instance you want to modify.
- In the top right corner of the console, click the Actions button.
- Hover over Security, then select Modify IAM role from the submenu.
- IAM role: Click the dropdown menu and select the role you just created:
ec2-app-deployment-role. - Click the Update IAM role button.
Note: Changes to IAM roles on an EC2 instance usually take effect immediately, but in some cases, it may take a few minutes for the new permissions to propagate to the instance.
Create Docker Compose File on the Server
Inside the EC2 instance create a directory with your app name and create docker-compose.yaml file inside of it.
mkdir nextjs-task-manager-app
cd nextjs-task-manager-app
vim docker-compose.yml
In this file put the following code. For now we will set image to image_placeholder We will change it later.
services:
  app:
    image: ${IMAGE_URI}
    container_name: nextjs_task_manager_app
    restart: always
    ports:
      - "3000:3000"
    environment:
      - NODE_ENV=${NODE_ENV}
      - NEXT_PUBLIC_APP_URL=${NEXT_PUBLIC_APP_URL}
      - BETTER_AUTH_SECRET=${BETTER_AUTH_SECRET}
      - BETTER_AUTH_URL=${BETTER_AUTH_URL}
      - MONGODB_URI=${MONGODB_URI}
      - COGNITO_CLIENT_ID=${COGNITO_CLIENT_ID}
      - COGNITO_CLIENT_SECRET=${COGNITO_CLIENT_SECRET}
      - COGNITO_DOMAIN=${COGNITO_DOMAIN}
      - COGNITO_REGION=${COGNITO_REGION}
      - COGNITO_USER_POOL_ID=${COGNITO_USER_POOL_ID}
    depends_on:
      mongodb:
        condition: service_healthy
    networks:
      - app_network
    healthcheck:
      test: curl -f http://localhost:3000 || exit 1
      interval: 30s
      timeout: 10s
      retries: 3
      start_period: 40s
    logging:
      driver: awslogs
      options:
        awslogs-group: /aws/ec2/nextjs-task-manager-app
        awslogs-region: ${AWS_REGION:-us-west-2}

  mongodb:
    image: mongo:7.0
    container_name: nextjs_task_manager_mongodb
    restart: always
    ports:
      - "27017:27017"
    environment:
      MONGO_INITDB_ROOT_USERNAME: ${MONGODB_ROOT_USERNAME:-admin}
      MONGO_INITDB_ROOT_PASSWORD: ${MONGODB_ROOT_PASSWORD}
      MONGO_INITDB_DATABASE: task_manager
    volumes:
      - mongodb_data_prod:/data/db
      - mongodb_config_prod:/data/configdb
    networks:
      - app_network
    healthcheck:
      test: echo 'db.runCommand("ping").ok' | mongosh localhost:27017/test --quiet
      interval: 10s
      timeout: 5s
      retries: 5

volumes:
  mongodb_data_prod:
    driver: local
  mongodb_config_prod:
    driver: local

networks:
  app_network:
    driver: bridge
Next, let’s create an environment variables file .env.production
vim .env.production
In this file we will put production configuration for the application. Needless to say you want to keep the values in this file secret.
NODE_ENV=production
IMAGE_URI=docker_image_placeholder
NEXT_PUBLIC_APP_URL=https://task-app.myapi.website
BETTER_AUTH_SECRET=mysupersecret
BETTER_AUTH_URL=https://task-app.myapi.website
MONGODB_URI=mongodb://admin:password@mongodb:27017/task_manager?authSource=admin
MONGODB_ROOT_PASSWORD=password
MONGODB_ROOT_USERNAME=admin

COGNITO_CLIENT_ID=cognito_client_id
COGNITO_CLIENT_SECRET=congito_client_secret
COGNITO_DOMAIN=cognito_domain
COGNITO_REGION=us-west-2
COGNITO_USER_POOL_ID=cognito_user_pool
Create Application Dockerfile
Back in VSCode let’s create Dockerfile in the root folder of the application. The application will need NEXT_PUBLIC_APP_URL build time environment variable. We will inject it using build-arg The way you create Dockerfile may vary depending on your application. Please check Next.js docs on how to deploy using Docker container.
# Build stage
FROM node:24-alpine AS builder

# Build-time arguments
ARG NEXT_PUBLIC_APP_URL
ARG MONGODB_URI
ENV NEXT_PUBLIC_APP_URL=$NEXT_PUBLIC_APP_URL \
    MONGODB_URI=$MONGODB_URI \
    NODE_ENV=production

WORKDIR /app

# Copy package files first for caching
COPY package*.json ./

# Install dependencies
RUN npm ci

# Copy source files
COPY . .

RUN npm run build

# Production stage
FROM node:24-alpine AS runner

WORKDIR /app

# Install dumb-init for proper signal handling
RUN apk add --no-cache dumb-init

# Copy standalone build from builder
COPY --from=builder /app/.next/standalone ./
COPY --from=builder /app/.next/static ./.next/static
COPY --from=builder /app/public ./public

# Create non-root user
RUN addgroup -g 1001 -S nodejs \
 && adduser -S nextjs -u 1001 \
 && chown -R nextjs:nodejs /app
USER nextjs

# Set production environment
ENV NODE_ENV=production

# Use dumb-init to handle signals
ENTRYPOINT ["dumb-init", "--"]
CMD ["node", "server.js"]
To make Next.js image smaller we are using standalone build. Please be sure in your next.config.ts file in Next.js config you specified standalone value for the output.
import type { NextConfig } from "next";

const nextConfig: NextConfig = {
  output: "standalone",
};

export default nextConfig;
Finally let’s add .dockerignore file to the Next.js application.
Dockerfile
.dockerignore
node_modules
npm-debug.log
README.md
.next
.git
We are ready to build and push the image to AWS Elastic Container Registry (ECR). Let’s go ahead and create a private repository.
Create ECR Repository
- Navigate to ECR:
- In the top search bar of the AWS Management Console, type ECR.
- Select Elastic Container Registry from the results.
- Start Creation:
- In the left-hand navigation pane, under Private registry, click on Repositories.
- Click the orange Create repository button in the top right.
- General Settings:
- Visibility settings: Ensure Private is selected.
- Repository name: Enter exactly:
nextjs-task-manager-app.Note: ECR repository names must be lowercase and can include hyphens, underscores, periods, and forward slashes.
- Image Scan and Tag Settings:
- Tag mutability: Leave as Mutable (this allows you to overwrite image tags like
latestwith new builds). - Scan on push: Toggle this to Enabled. This is a best practice that automatically scans your Next.js images for software vulnerabilities whenever you push a new version.
- Tag mutability: Leave as Mutable (this allows you to overwrite image tags like
- Encryption Settings:
- Leave KMS encryption disabled to use the default ECR encryption (AES-256), which is free of charge.
- Finalize:
- Scroll to the bottom and click Create repository.
How to View Push Commands
Once the repository is created, you will see it in your list. To see exactly how to upload your Next.js app from your terminal:
- Click the radio button next to
nextjs-task-manager-app. - Click the View push commands button at the top.
- This will provide a popup with the exact 4 commands you need to:
- Authenticate your Docker client to AWS.
- Build your Docker image locally.
- Tag the image for this specific repository.
- Push the image to the cloud.
Build and Push Docker Image to AWS ECR
Follow the push commands provided by the ECR. In our case we will use the following command to build the docker image. The application requires two environment variables during build time, NEXT_PUBLIC_APP_URL and MONGODB_URI therefore we will pass them as the build args when building docker image.
docker build --build-arg NEXT_PUBLIC_APP_URL=https://task-app.myapi.website --build-arg MONGODB_URI=mongodb://admin:password@localhost:27017/task_manager -t nextjs-better-auth-cognito-dev .
After the docker image is pushed to the Amazon ECR, we can click on the repository, then on the image we just created and copy the image URI in the details card. Set value for the IMAGE_URI variable in .env.prodction file on the EC2 instance.
Now all we have to do is to run docker compose to start the application. We can do it with the command two commands. The first command logs you into the ECR repository. We need this to pull the image we just created and pushed to AWS ECR. The second command runs docker compose.
aws ecr get-login-password --region us-west-2 | docker login --username AWS --password-stdin $REPOSITORY_URI

docker compose --env-file .env.production up -d
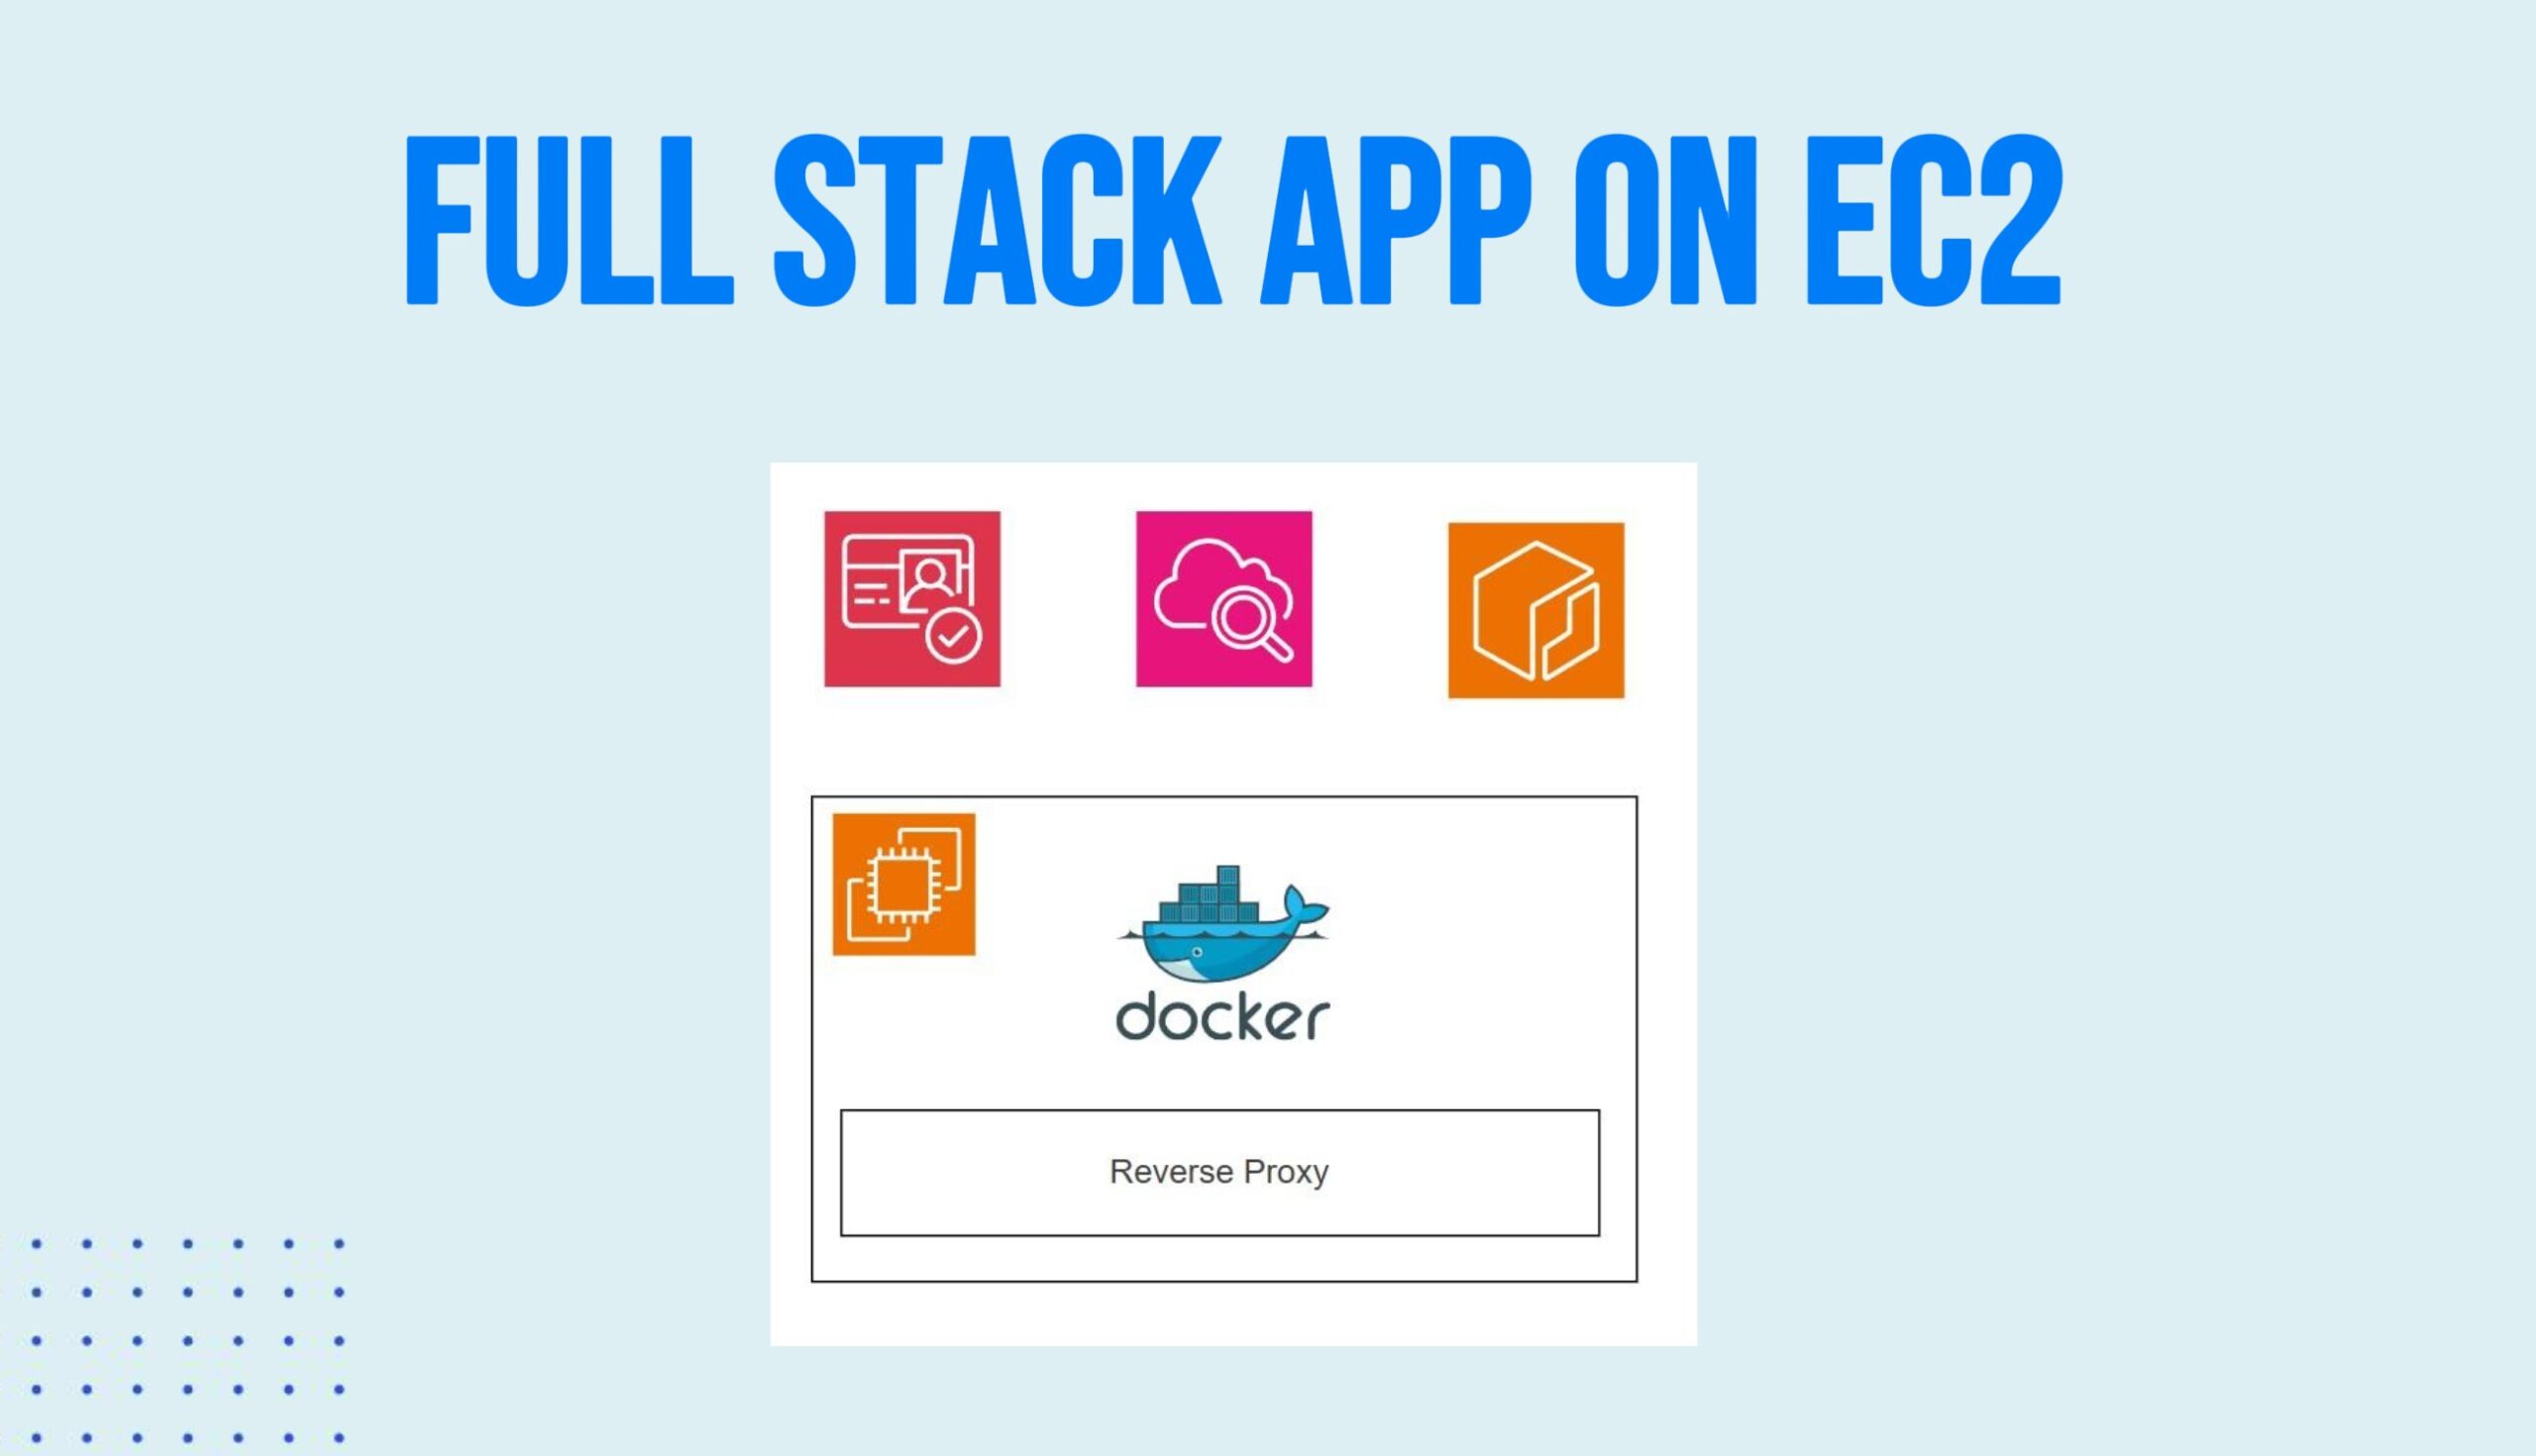
Domain Setup and Reverse Proxy
When running our application with Docker Compose, it listens for incoming connections on port 3000. While this works well for local development, production web applications typically run on standard ports—port 80 for HTTP and port 443 for HTTPS with SSL encryption.
To bridge this gap, we use a reverse proxy. A reverse proxy sits in front of our application and forwards incoming requests from standard web ports to the internal port where the application is running.
One of the most popular reverse proxies is Nginx. Although it’s powerful and widely used, setting it up often involves writing custom configuration files and integrating Let’s Encrypt to manually manage SSL certificates.
An alternative approach is Caddy, a modern reverse proxy that focuses on simplicity. Caddy requires minimal configuration and automatically provisions and renews SSL certificates out of the box. This significantly reduces setup complexity and makes it an excellent choice for containerized applications.
For these reasons, we’ll use Caddy as our reverse proxy in this project.
To install Caddy, let’s run the following commands.
sudo apt install -y debian-keyring debian-archive-keyring apt-transport-https curl
curl -1sLf 'https://dl.cloudsmith.io/public/caddy/stable/gpg.key' | sudo gpg --dearmor -o /usr/share/keyrings/caddy-stable-archive-keyring.gpg
curl -1sLf 'https://dl.cloudsmith.io/public/caddy/stable/debian.deb.txt' | sudo tee /etc/apt/sources.list.d/caddy-stable.list
sudo apt update
sudo apt install caddy
Next, lets update Caddy file in /etc/caddy/Caddyfile to use our domain and enable HTTPS.
task-app.myapi.website {
    reverse_proxy localhost:3000
}
Let’s reload the new Caddy configuration with the command
sudo systemctl restart caddy
Now all we have to do is to point our domain task-app.myapi.website to the EC2 instance. I have my domains registered at Godaddy. You may have your domains registered somewhere else. If you don’t have a domain you can purchase it in AWS Route 52, or you can buy it from a third party like Namecheap and connect it to Route 53. Here’s a link to the video on how to buy a domain from Namecheap and connect it to Route 53.
Regardless where you domain is, underlining idea is the same: we need to create an A record in the DNS settings to point a domain (in our case task-app.myapi.website) to the public IP address of the EC2 instance. Let’s go ahead and do it in Godaddy.
Step 1: Get your EC2 Public IP Address
Before leaving AWS, you need the destination address for your domain.
- In the EC2 Dashboard, click on Instances.
- Select your instance (
nodejs-cognito-instance). - In the Instance summary tab below, locate the Public IPv4 address.
- Copy this IP address (e.g.,
54.123.45.67).
Pro Tip: By default, EC2 public IPs change if you stop and start the instance. To prevent your website from breaking later, consider allocating an Elastic IP in the EC2 “Network & Security” menu and associating it with your instance first.
Step 2: Create the DNS Record in GoDaddy
Now, you will tell GoDaddy to send traffic for the subdomain to that AWS IP.
- Log in to your GoDaddy Portfolio.
- Find your domain
myapi.websiteand click DNS (or Manage DNS). - In the DNS Records section, click Add New Record.
- Fill in the fields as follows:
- Type:
A(This maps a name to an IP address). - Name:
task-app(This is the subdomain part. GoDaddy automatically appends.myapi.website). - Value: Paste your EC2 Public IPv4 address here.
- TTL: Leave as
Default(usually 1 hour).
- Type:
- Click Save.
DNS changes can take anywhere from a few minutes to an hour to “propagate” across the internet.
We are not done yet. We have 2 more things to take care of.
Setup CloudWatch Logging and Cognito URLs
We will create a log group for /aws/ec2/nextjs-task-manager-app the same one we specified in the docker compose file.
Create the CloudWatch Log Group
- Navigate to CloudWatch:
- In the top search bar of the AWS Management Console, type CloudWatch.
- Select CloudWatch from the service list.
- Access Log Groups:
- In the left-hand navigation pane, expand the Logs menu.
- Click on Log groups.
- Initiate Creation:
- Click the orange Create log group button in the top right.
- Configure Log Group Settings:
- Log group name: Enter the exact path:
/aws/ec2/nextjs-task-manager-app - Retention setting: By default, this is set to “Never expire.”
- Best Practice: Select a specific period (e.g., 30 days or 90 days) to avoid unnecessary long-term storage costs.
- Log group name: Enter the exact path:
- Encryption and Tags (Optional):
- KMS key ID: Leave blank to use the default AWS encryption.
- Tags: (Optional) Add a tag such as
Project: NextJS-Task-Managerto help with billing organization.
- Finalize:
- Click Create.
Since the application uses AWS Cognito as an Identity provider, beside the environment variables that we configured, we also need to specify production callback and logout URLs.
Configure Callback and Logout URLs
- Navigate to Cognito:
- Search for Cognito in the AWS Console search bar and select it.
- Click on User pools in the left menu and select your specific User Pool from the list.
- Access App Client Settings:
- In the top tabs, select App integration.
- Scroll down to the App clients and analytics section.
- Click on the name of your specific App client (e.g.,
nextjs-client).
- Edit Hosted UI Settings:
- Look for the Hosted UI section (or Login pages tab in some console versions).
- Click the Edit button in the top right of that section.
- Add Allowed Callback URLs:
- Under Allowed callback URLs, click Add callback URL (or simply paste into the existing field).
- Enter:
https://task-app.myapi.website/api/auth/callback/cognito - Note: If you have multiple URLs (like a localhost for dev), separate them with a comma.
- Add Allowed Sign-out URLs:
- Under Allowed sign-out URLs, click Add sign-out URL.
- Enter:
https://task-app.myapi.website/api/auth-logout
- Verify OAuth 2.0 Settings:
- Ensure Authorization code grant is checked under Allowed OAuth flows.
- Ensure openid, email, and profile are checked under Allowed OAuth scopes.
- Save Changes:
- Scroll to the bottom and click Save changes.
Verifying Application and Deploying Changes
We are all set. Our application is live. We can visit using the URL https://task-app.myapi.website Caddy will automatically issue the certificate for us and will take care of redirecting anyone from unsecure port 80 to secure port 443.
In order to order to deploy changes to our application we need to repeat the steps where we push docker image to the ECR repository. Update the image URL in the .env.production file. And run the following commands to bring down docker compose, login into ECR, and bring docker compose back up so it can pull the new image.
docker compose --env-file .env.production down

aws ecr get-login-password --region us-west-2 | docker login --username AWS --password-stdin {$REPOSITORY_URI}

docker compose --env-file .env.production up -d
Also, keep in mid that the space on the EC2 instance is limited and you may want to delete “old” and unused images. You can do it with the following command.
docker image prune -a -f
Obviously, all the above commands can be automated so you can just merge the PR and the application gets deployed. But this is a topic for another article.